Note
Access to this page requires authorization. You can try signing in or changing directories.
Access to this page requires authorization. You can try changing directories.
DocumentDB for VS Code brings Azure DocumentDB into your editor. Use its open-source graphical user interface (GUI) to browse documents, run queries, and manage collections without leaving Visual Studio Code.
Explore your cluster in a dashboard, build visual queries with field-aware suggestions, or switch to an interactive shell or a reusable script.
The extension also works with other MongoDB API-compatible databases. It connects through the MongoDB API wire protocol, giving you a consistent GUI across supported databases.
The extension runs on Windows, macOS, and Linux. Its query runtime is built in: you don't need to install MongoDB Shell or configure an external executable. Start with a connection and a query, then try the optional workflows that fit your work.
Prerequisites
- An Azure subscription. If you don't have an Azure subscription, create a free account.
An existing Azure DocumentDB cluster
- If you don't have a cluster, create a new cluster
- Visual Studio Code.
- Network access from your development environment to the cluster. For public connections, configure firewall rules for your client IP address. For private connections, use an environment that can reach the cluster's private endpoint.
- Database credentials or a Microsoft Entra identity with permissions to access your data. To try the sample, you need permissions to create a collection and insert documents. Use a development database rather than production data.
Install and connect
Install the DocumentDB for VS Code extension, or search for DocumentDB for VS Code in the Extensions view and select Install.
Use Azure service discovery to find your cluster without copying its endpoint:
- Open DocumentDB from the Activity Bar. In Service Discovery, select Azure DocumentDB and sign in to Azure if prompted.
- Browse your subscription and expand your cluster to connect.
- Choose an authentication method supported by your cluster. For Microsoft Entra ID, sign in with an identity that has database access. For Username and Password, enter your database credentials.
You can save the cluster to DocumentDB Connections by using its context menu or save icon. If you already have a connection string, use New Connection instead and enter it there.
Explore your cluster dashboard
Open the context menu for your cluster and select Cluster Dashboard. The dashboard brings your databases, collections, and storage information into one view. Check connection status, filter the inventory, and open a collection without expanding every node in the sidebar.

For an empty cluster, select New Database and name it store. Open that database, select New Collection, and name the collection products. If you already have data, select a database to explore its collections and open the collection you want to query.
Note
Don't include any personal, sensitive, or confidential information in resource names (for example, table name, database name) and resource tags. Data you enter in these fields isn't considered customer data.
Use Refresh after changes to update the inventory. Statistics depend on what the server reports; the dashboard shows a snapshot, not a live monitor of running operations. You can also open the shell, copy your connection string, and access collection actions from the dashboard.
Try a query with sample data
Already have a collection to explore? Skip the sample insert and use your own field names in the filter. Otherwise, add these three products to your new store.products collection. Screenshots in this article illustrate the extension with other demo datasets.
From the dashboard, select Open Shell. Alternatively, open the context menu for the
productscollection in the sidebar and select Open Interactive Shell.Run the following command to select the
storedatabase before inserting the sample documents:use storeRun the following command once to insert the sample documents into
store.products:db.products.insertMany([ { _id: "tent", name: "Trail Tent", price: 420, quantity: 140, sale: true }, { _id: "sleeping-bag", name: "Sleeping Bag", price: 150, quantity: 118, sale: true }, { _id: "mittens", name: "Mittens", price: 35, quantity: 121, sale: false } ])Open the collection in Collection View. You can use the Open Collection View icon beside the collection in the sidebar, or open the collection from the dashboard.
Find what you need
In Collection View, enter this expression in Filter to find sale items that cost more than 100:
{ sale: true, price: { $gt: 100 } }
Set Project to { name: 1, price: 1, _id: 0 } and Sort to { price: -1 }, then select Find Query. With the sample data, the results show Trail Tent and Sleeping Bag, ordered from highest to lowest price.
Tip
Azure DocumentDB indexes only _id by default. For larger collections, create indexes that match your query patterns. As an optional follow-up, use the Indexes tab in Collection View to manage indexes and Query Insights to inspect query performance.

As you enter a query, the editor suggests fields from the documents you browse, relevant operators, and values that match each field's type. Hover over an operator for its documentation. Suggestions use locally gathered schema information, not an external service.
Switch between Table, Tree, and JSON views to inspect your results. You can create, edit, or delete documents, import JSON data, and export documents or query results.
Explore in the interactive shell
Use the built-in shell for quick questions: Which collections exist? How many products are on sale? What does one document look like?
Open it with Open Shell on the cluster dashboard or Open Interactive Shell on a cluster, database, or collection context menu. The shell reuses your connection, including Microsoft Entra ID authentication. Its header shows the connection, authentication method, and active database so you can check where you're working before running commands.
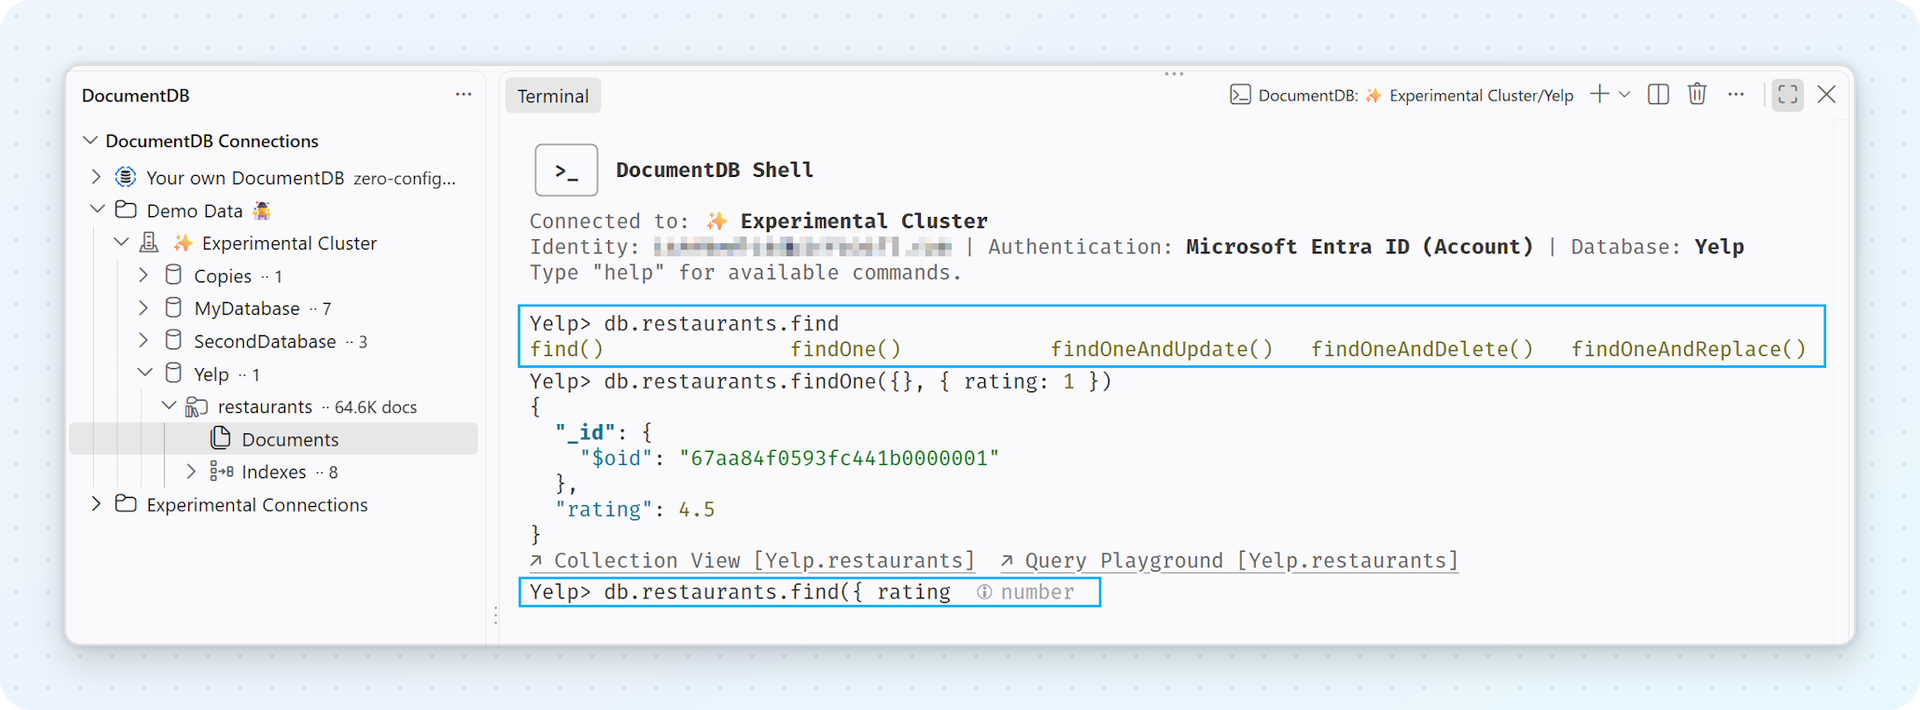
Try these commands one at a time:
use store
show collections
db.products.countDocuments({ sale: true })
Press Tab for completions, enter it to fetch the next batch of a query's results, or run help to see available commands. Variables persist within a session, so you can refine a query without starting over. Press Ctrl+C to cancel a long-running operation.
Save a query in a playground
When a one-off query becomes something you want to keep, move it to a Query Playground. Playground files use the .documentdb.js extension and support JavaScript, aggregation pipelines, variables, and loops.
Open the context menu for
storeorproductsand select New Query Playground. The file connects to that cluster and database automatically. From Collection View, you can also select Open in Playground to transfer your current find query.Replace the generated sample with this aggregation to find sale items with enough stock:
db.products.aggregate([
  { $match: { sale: true, price: { $gte: 100, $lte: 1000 }, quantity: { $gt: 50 } } },
  { $project: { _id: 0, name: 1, price: 1, quantity: 1 } },
  { $sort: { price: -1 } }
])
Select Run above the block, or Run All at the top of the file and confirm when prompted. Results appear in a side panel. Save the file as
sale-products.documentdb.jsto keep the script.

Separate queries with blank lines to run them independently. Use Run All when later blocks depend on variables from earlier blocks. The Collection View and Shell links above a block let you continue in another query surface without copying the code manually.
Make room for experiments
Want to try an update or delete without changing your original documents? Copy a small development collection, then run your experiment against the copy.
- In DocumentDB Connections, open the context menu for
productsand select Copy Collection. - Open the context menu for the destination database and select Paste Collection. You can use the same database or a database on another connected server.
- Name the new collection
products-experiment. Choose No, only copy documents for a data-only copy, then review the source and destination and confirm. - Open the copied collection and check its contents before experimenting. Create a playground from
products-experimentor change your shell commands to usedb.getCollection("products-experiment").
If you paste into an existing collection, the wizard offers strategies to stop on duplicate _id values, skip conflicting documents, overwrite them, or generate new IDs. Review the strategy before confirming: stopping on a conflict doesn't roll back documents already copied.
Important
Collection copy streams data through your development machine. It isn't an atomic snapshot or a replacement for backups, and changes to the source during the copy can affect the result. Use it for small, relatively static development datasets. For production migration, use a dedicated migration workflow.
You can also copy eligible secondary indexes with a collection, or copy index definitions separately from the Indexes nodes. If the source contains a TTL or unique index, choosing Yes, copy indexes stops the paste before confirmation. Run Paste Collection again and choose No, only copy documents. After copying the documents, copy the indexes separately by using the Indexes context menus. TTL indexes can delete documents during the copy, and unique indexes can reject them. See Copy and paste collections and indexes (user manual) for the separate index workflow and its safeguards.
Discover more tools
Recent releases add more ways to work with your data, from index management to a local development environment:
- Manage indexes beside your queries. Open Indexes in Collection View to inspect existing indexes and create new ones through a guided form. Use Preview as JSON to review a definition, or send the command to a playground or shell. Available index types and operations depend on your database.
- Investigate a slow query. Open Query Insights to examine explain plans and performance diagnostics. Optional AI-powered index recommendations are experimental and require opt-in, GitHub Copilot, and an active Copilot subscription.
- Try DocumentDB locally. Under Your own DocumentDB in the Connections view, select Set up DocumentDB Local for a guided setup with optional sample data. This optional workflow requires a working Docker Engine or Docker Desktop environment; connecting to Azure DocumentDB doesn't. See Set up DocumentDB Local (user manual).
- Connect from more environments. Service discovery also supports MongoDB Atlas and Kubernetes. On an Azure VM, you can connect to Azure DocumentDB with a configured managed identity instead of storing a database password.

For the latest additions and fixes, see the extension release announcements.