Note
Access to this page requires authorization. You can try signing in or changing directories.
Access to this page requires authorization. You can try changing directories.
When a subscriber no longer needs a Visual Studio subscription, unassign the subscription from the user. The user no longer needs Visual Studio licensing or access to benefits.
To learn how to delete assignments, watch the following video or continue reading.
Delete a subscription assignment
You have three different options for how to complete this task:
Select the name of the subscriber you want to remove.
To select multiple subscribers for removal, select the circle to the left of each subscriber's name. You can also hold down the Ctrl key and select each subscriber you want to remove.
To remove a range of subscribers, select the first subscriber, press the Shift key, and then select the last subscriber. Press the Ctrl+A buttons to select and remove all subscribers.
To delete the selected subscribers, select Delete.
When a message appears that asks you to confirm the deletion, select OK.
Note
If you added subscription assignments through Microsoft Entra groups, it might take up to 24 hours for the deletion to be updated in the admin portal. For more information about by using Microsoft Entra groups to manage subscriptions, see this article about adding multiple users.
Delete a large number of subscriptions
If you need to delete a large number of subscription assignments, you can use the Bulk edit feature.
Important
Before you make large changes to your subscriber list, we recommend that you create a backup of your current list. Select the Export option to create a backup. This action places an Excel copy of your current list in your downloads folder.
Don't use this approach to manage cloud subscriptions. Although you can download and complete the bulk edit template, you can't upload the template with your changes.
Note
For best practices, it's recommended to process a maximum of 500 users at a time when editing a large number of subscriptions.
Sign in to the Admin Portal
Select the Bulk edit option.
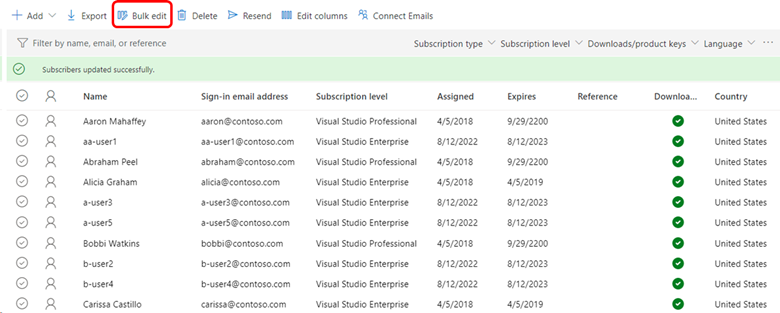
The Edit Multiple Subscribers dialog appears.
Select the Export this excel link in step 1.
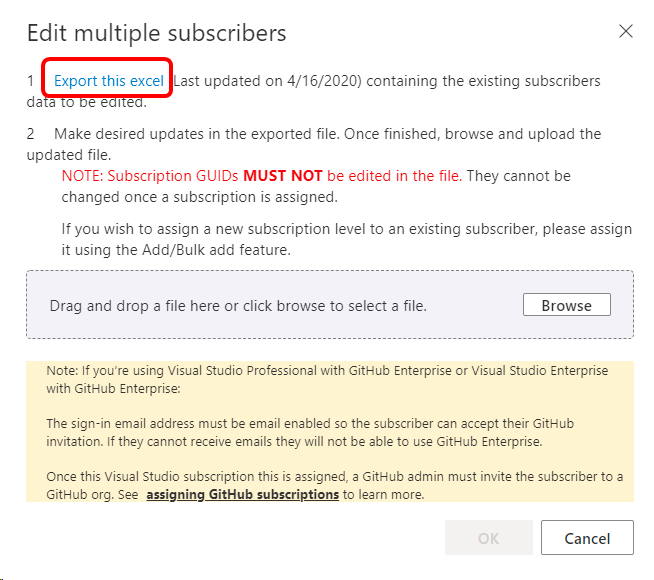
Your subscriber list downloads as an Excel file. Locate the file in your downloads folder and then open it. The file name contains the type of agreement, the agreement number, and the current date.
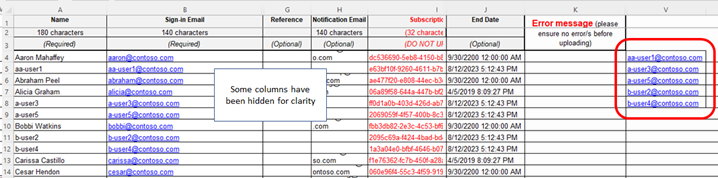
In a column to the right of the template, paste the email addresses of the subscribers you want to remove. (In the current template, column V is the first one available. Don't unhide any hidden columns and use them.) For this example, we're removing these users:
aa-user1@contoso.coma-user3@contoso.coma-user5@contoso.comb-user2@contoso.comb-user4@contoso.com
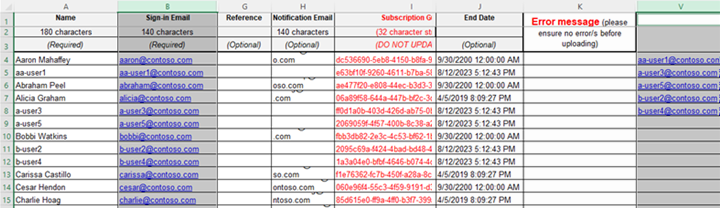
Select both the column that contains the users you want to delete, and the column that contains the email addresses of all the users. In this case, that's column B and column V. To select the columns, select the first column heading, and then Ctrl+Select the second column heading. The template should now look like this:
On the Home tab in Excel, select Conditional Formatting, choose Highlight Cells Rules, and then select Duplicate Values.
Select OK to accept the default color choice. The users you want to delete should be highlighted in both columns.
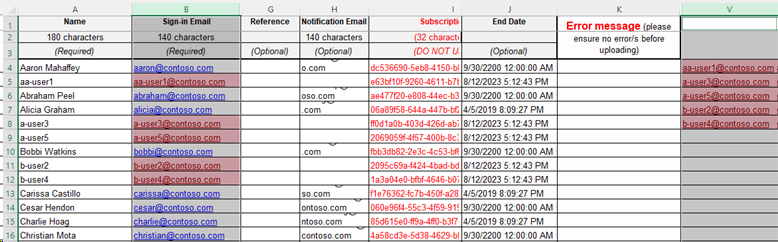
To deselect the two columns, select a cell in the spreadsheet.
On the Data tab, select Filter.
Select the filter dropdown menu in column B, choose Sort by color, and select the color that was applied to the duplicate cells. You should now see only the users you want to delete.
In the Reference column for each user, identify the users you want to delete by entering a specific word or phrase. Use the same term for all the users. In the following example, the phrase is DELETE USER. Use the fill down feature in Excel to replicate the phrase for all the users. Your template should now look like this:

Save the template.
Switch back to the admin portal. The Edit multiple subscribers dialog should still be open. (If it's not, just reselect the Bulk edit option.)
Select the Browse button, select the file you saved, and select Open. The name of your file is displayed in the dialog.
Select OK.
You should now see your subscriber list. The subscribers you want to delete should have the identifying phrase you defined earlier in the Reference column. If it's not visible and you want to display it, select the Edit columns menu option and add the column.
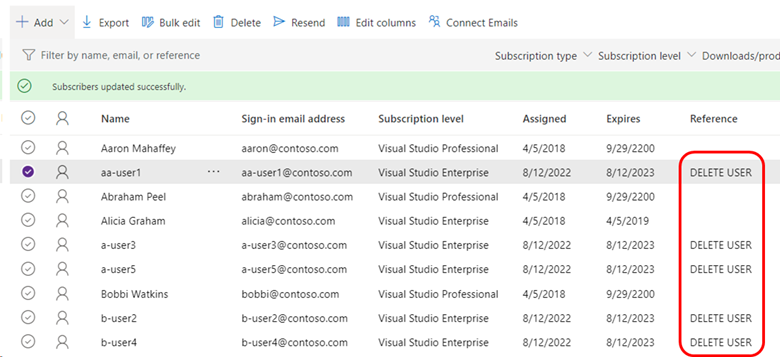
In the Filter by name, email or reference field, enter the word or phrase that you used to mark the users you want to delete. The filter is applied even if the Reference column isn't displayed.
You should now see only the users you need to delete. You can select one user, then use Ctrl+A to select them all, and choose Delete.
Clear the filter field to display your updated subscriber list.
Related content
- Subscriptions support
- Visual Studio documentation
- Need to change a subscription without deleting it? Learn how to edit subscriptions.
- To find a particular subscription, check out search for a subscription.
- Need to create a list of all your subscriptions? See export subscriptions.