Hyper-V Replica helps you protect your workloads by replicating virtual machines (VMs) between Hyper-V hosts running Windows Server. This article explains how to replicate a virtual machine after you enable replication on the receiving host or cluster by using Windows Admin Center - Virtualization mode, Hyper-V Manager, Failover Cluster Manager, or PowerShell.
You can replicate between clusters, single hosts, or a combination of both. If you use a certificate for authentication, there's no Active Directory dependency between the hosts. Single hosts can either be domain members or be in a workgroup.
For more information about Hyper-V Replica and how it works, see Hyper-V Replica overview. If you need to enable Hyper-V Replica, see:
Prerequisites
Before you begin, make sure you meet the following prerequisites:
You have a Hyper-V cluster to receive the replicated VM on which you already configured Hyper-V Replica. If you need to configure Hyper-V Replica, see Enable Hyper-V Replica on a failover cluster or Enable Hyper-V Replica on a single host. You also have another cluster or single host that runs the VM you want to replicate.
Sufficient network connectivity and bandwidth between primary and replica sites to meet your Recovery Point Objective (RPO) and initial replication method. Consider dedicating or QoS‑throttling replication traffic to avoid impacting production workloads.
If you're using certificate-based authentication, you need to have a valid certificate installed on each host in each cluster or single host, both sending and receiving. The certificate must meet the following requirements:
- Not be expired
- Have both Client and Server Authentication Enhanced Key Usage (EKU) attributes and an associated private key.
- Terminate at a valid root certificate.
- The subject common name (CN) or subject alternative name (SAN) must match the fully qualified domain name (FQDN) of the Hyper-V Replica Broker role you provide for the receiving cluster.
Adequate storage capacity on the replica site for the VM, including its configuration files, virtual hard disk (VHDX or VHD) files, and optional extra recovery points (snapshots).
A user account that's a member of the Hyper-V Administrators security group on each host. In an Active Directory domain, you can add users or groups to this group by using Group Policy Preferences. Alternatively, the account can be a local administrator on each host. You can find more information about the Hyper-V Administrators group in Active Directory Security Groups.
Replicate a virtual machine
You need to enable replication for each VM you want to replicate. You can replicate a VM by using the following combinations:
- Hyper-V Manager on clusters or single hosts.
- Failover Cluster Manager on clusters only.
- PowerShell on clusters or single hosts.
- Windows Admin Center - Virtualization mode on clusters or single hosts.
Select the relevant tab for instructions.
Important
Configuring Hyper-V Replica by using Windows Admin Center - Virtualization mode is currently in PREVIEW.
This information relates to a prerelease product that may be substantially modified before it's released. Microsoft makes no warranties, expressed or implied, with respect to the information provided here.
For more information about Windows Admin Center - Virtualization mode, see Windows Admin Center - Virtualization mode overview.
To enable and configure Hyper-V Replica by using Windows Admin Center - Virtualization mode:
Go to your URL for Windows Admin Center - Virtualization mode and sign in.
In the resources pane, expand the host that contains the VM you want to replicate, and then select the VM to enter its overview.
On the menu bar, select Manage, and then select Configure Replication to open the Enable Replication pane.

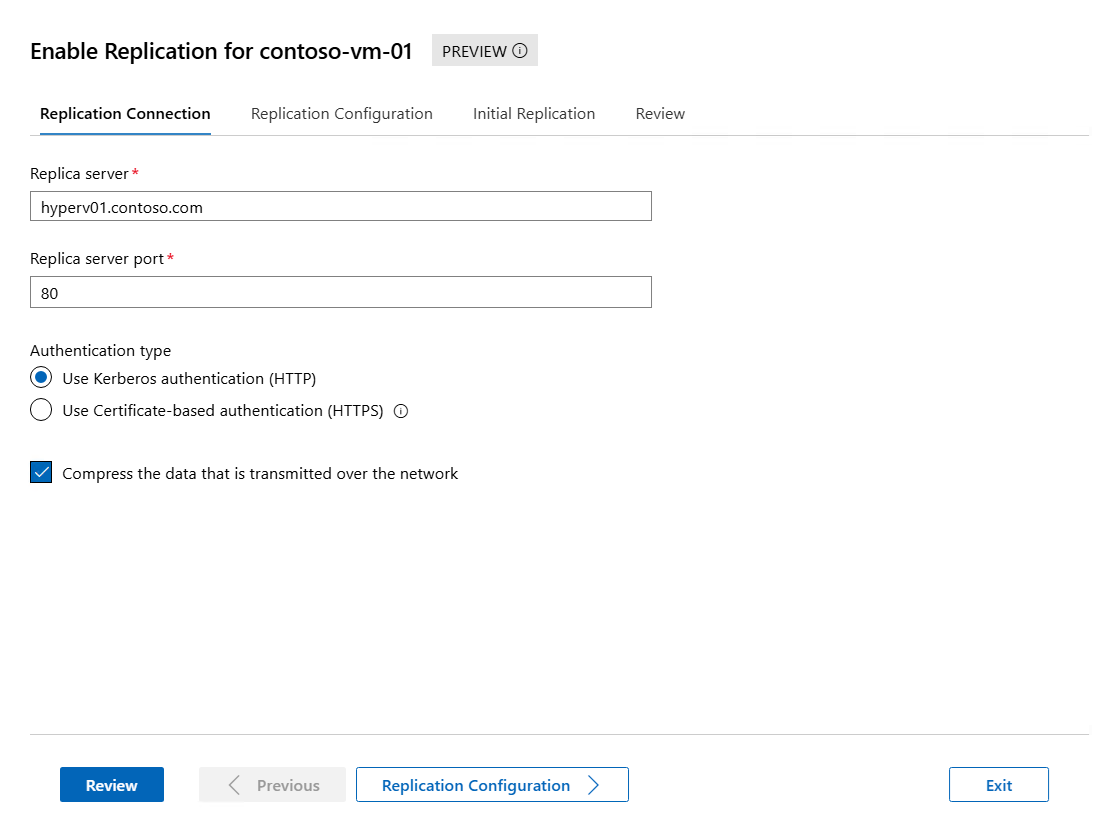
For the Replication Connection tab, enter the following information, and then select Replication Configuration to continue:
For Replica Server, enter either the NetBIOS or FQDN of the Hyper-V host you're replicating to.
For Replica server port, enter the port number you configured on the replica host for Hyper-V Replica.
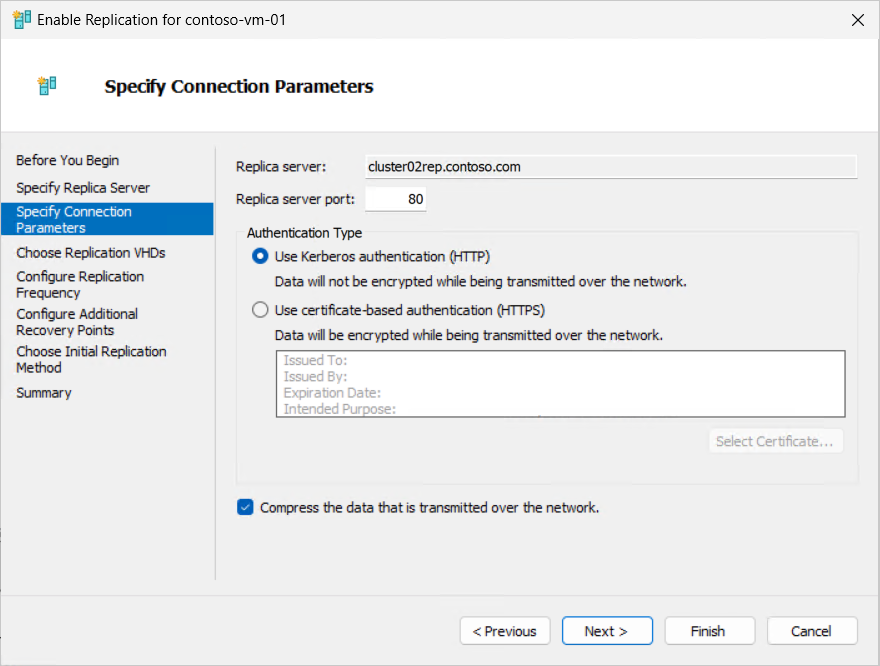
For Authentication Type, select the correct value from Use Kerberos authentication (HTTP) or Use Certificate-based authentication (HTTPS) based on the authentication method you configured on the replica host. If you're using certificate-based authentication, select Select Certificate, and then select the certificate for the primary host that matches the requirements. If you want to compress the data that is transmitted over the network, check the box.
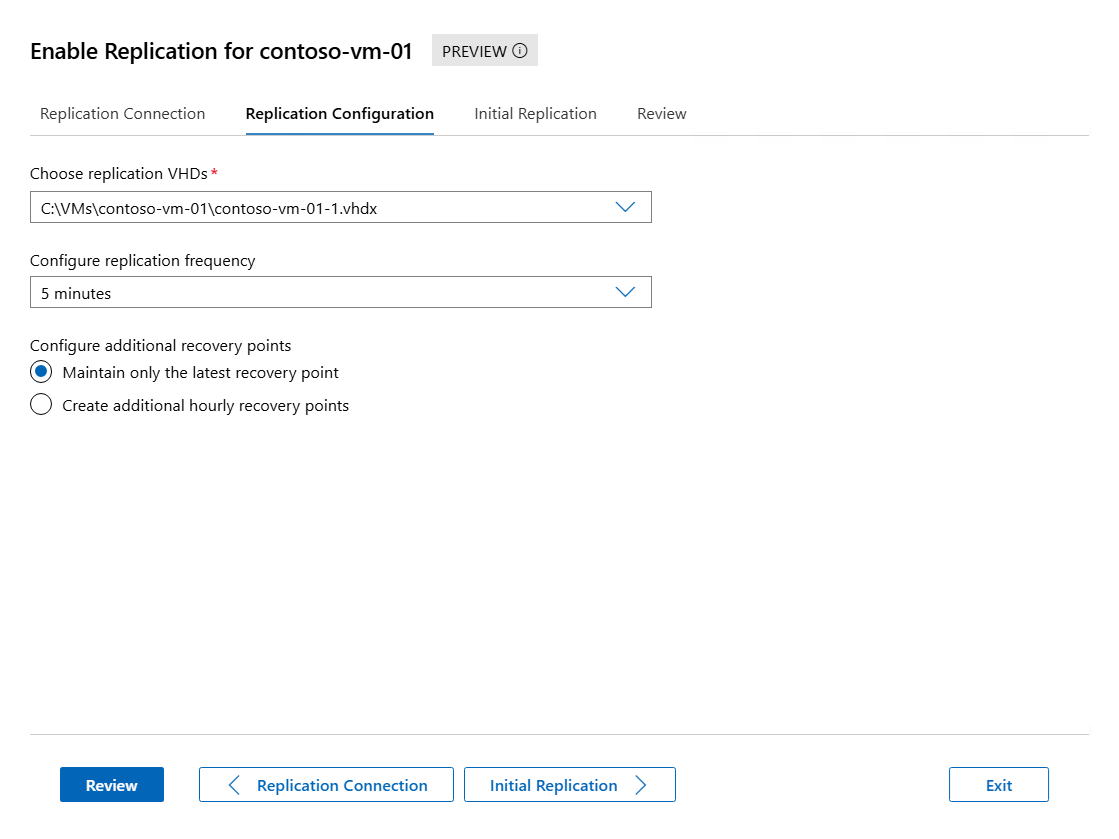
For the Replication Configuration tab, complete the following information, then select Initial Replication to continue:
For Choose replication VHDs, make sure the checkboxes for the VHDs you want to replicate are selected, and clear the checkboxes for any VHDs that you want to exclude from replication.
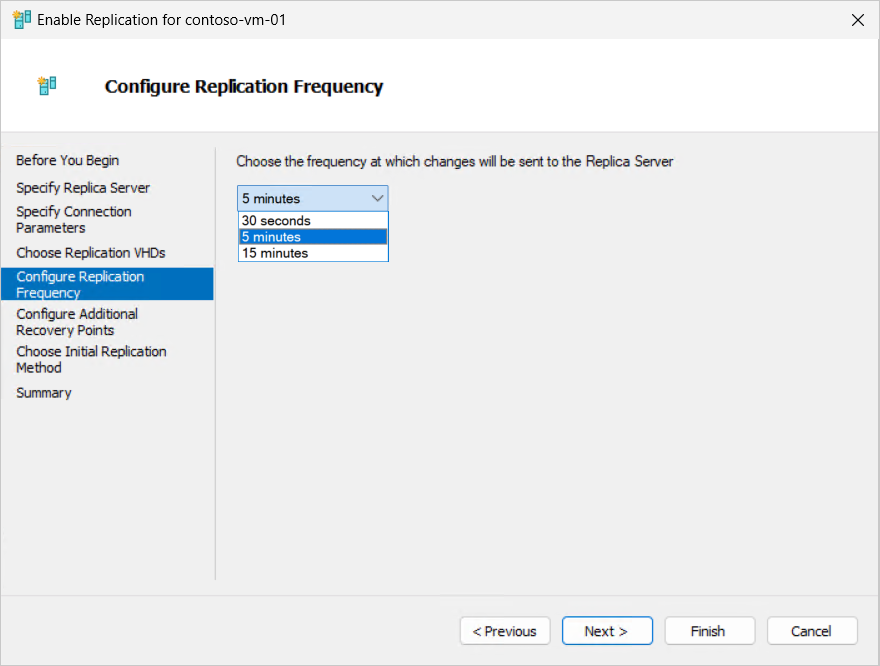
For Replication Frequency, specify how often changes should be synchronized from the primary to replica clusters or hosts from 30 seconds, 5 minutes, or 15 minutes.
For Configure additional Recovery Points, select Maintain only the latest recovery point or Create additional hourly recovery points and the number of extra recovery points you want to create in hours. When you create extra hourly recovery points, you can also check the box Volume Shadow Copy Service (VSS) snapshot frequency if you want recovery points to provide application-consistent recovery points for VMs running VSS-aware applications.
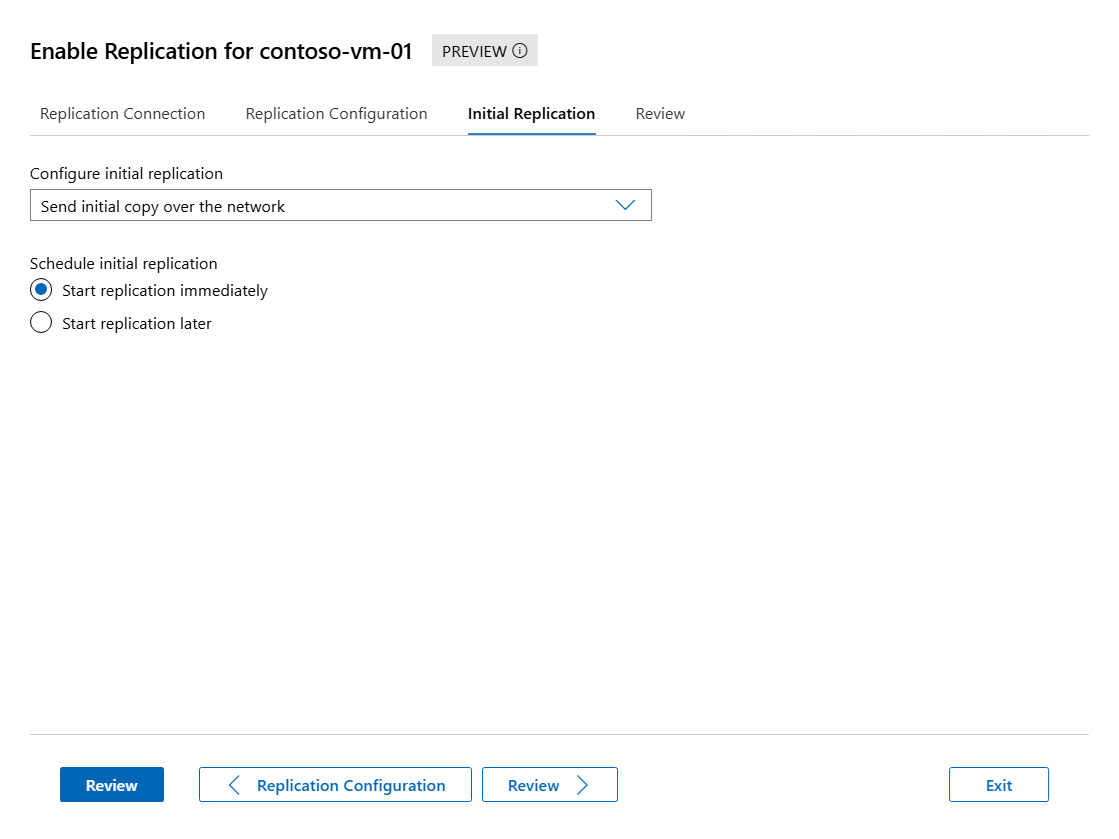
For the Initial Replication tab, complete the following information, then select Review to continue:
For Configure initial replication, select the initial replication method. The total size of the initial copy is displayed. Select an option from the following list:
- Send initial copy over the network: this method is the default option. You can optionally specify whether to start replication immediately, or start replication at a specified time and date up to seven days in the future.
- Send initial copy using external media: specify a folder location on local or external media where the initial copy can be stored. To learn about the process to import the initial copy, see Send initial copy using external media.
Review the summary information, and then select Enable Replication.

You can check that replication enabled successfully in the Notifications pane.

To monitor the initial replication progress, see the section Monitor replication progress. You can change replication settings later if you need to in the Replication section of the VM settings.
If you chose to send the initial copy by using external media, see the section Send initial copy using external media for the process to import the initial copy. A placeholder VM is created on the replica site and its replication health state is Warning. The replica contents for the VM are stored on your external media in a subfolder for the VM.
To replicate a virtual machine by using Hyper-V Manager:
Open Hyper-V Manager on a device you use to manage a host in the primary cluster or a primary single host with the VM, or on the host itself where Windows Server with Desktop Experience is installed.
In the resources pane, select the host that contains the VM you want to replicate.
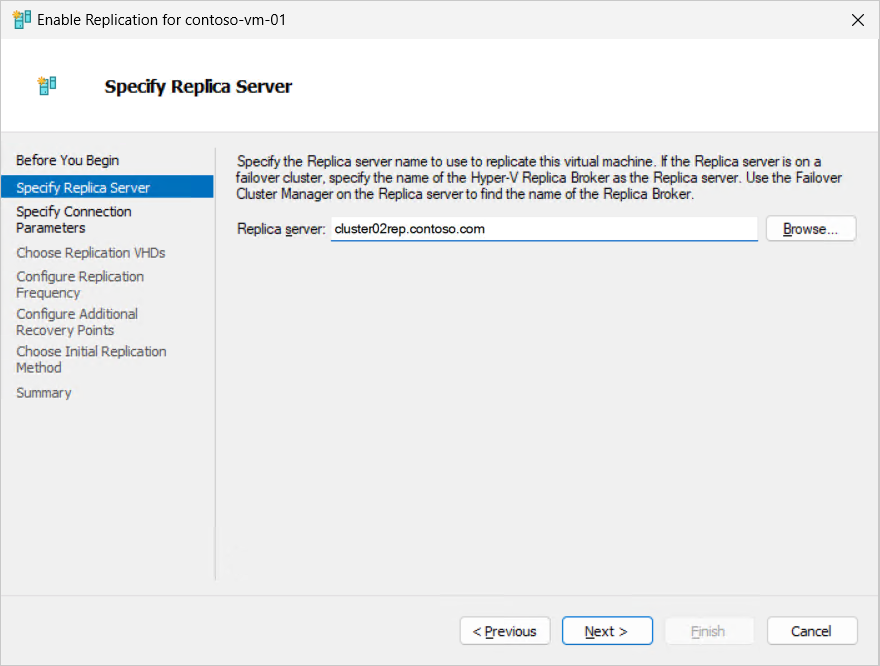
Right-click the VM you want to replicate, and then select Enable Replication. In the Enable Replication screen, if you see Before You Begin, select Next.
For Specify Replica Server, in the Replica Server box, enter either the NetBIOS or FQDN of the Replica server. If the Replica server is part of a failover cluster, enter the name of the Hyper-V Replica Broker. Then select Next. The connection to the replica server is verified to retrieve the authentication and port settings you configured for the replica server.
Review the replica server settings. If you're using certificate-based authentication, select Select Certificate, and then you're prompted to select the certificate for the primary host that matches the requirements. If you want to compress the data that is transmitted over the network, check the box. Select Next.
For Choose Replication VHDs, make sure the checkboxes for the VHDs you want to replicate are selected, and clear the checkboxes for any VHDs that you want to exclude from replication. Then select Next.

For Configure Replication Frequency, specify how often changes should be synchronized from the primary to replica clusters or hosts from 30 seconds, 5 minutes, or 15 minutes. Then select Next.
For Configure Additional Recovery Points, select Maintain only the latest recovery point or Create additional hourly recovery points and the number of extra recovery points you want to create in hours. Then select Next.
When you create extra hourly recovery points, you can also check the box Volume Shadow Copy Service (VSS) snapshot frequency if you want recovery points to provide application-consistent recovery points for VMs running VSS-aware applications.

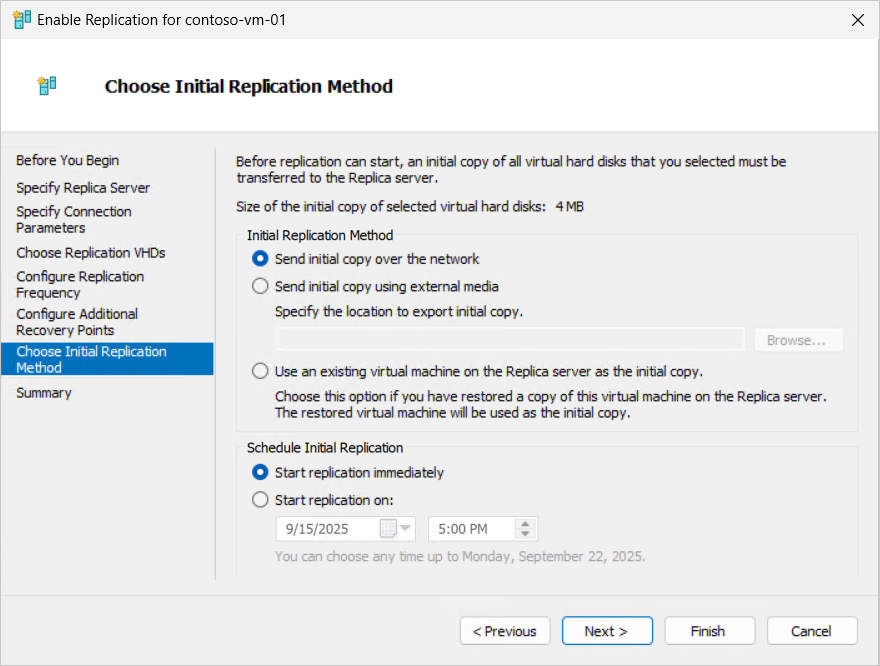
For Choose Initial Replication, select the initial replication method. The total size of the initial copy is displayed. Select an option from the following list, and then select Next.
- Send initial copy over the network: this method is the default option.
- Send initial copy using external media: specify a folder location on local or external media where the initial copy can be stored.
- Use an existing virtual machine on the Replica server as the initial copy: restore the VM on the replica server and use it as the basis for replication, then replicate only the changes. You can find the process to import the initial copy in the section Send initial copy using external media.
If you select Send initial copy over the network or Use an existing virtual machine on the Replica server as the initial copy, you can optionally specify whether to start replication immediately, or start replication at a specified time and date up to seven days in the future.
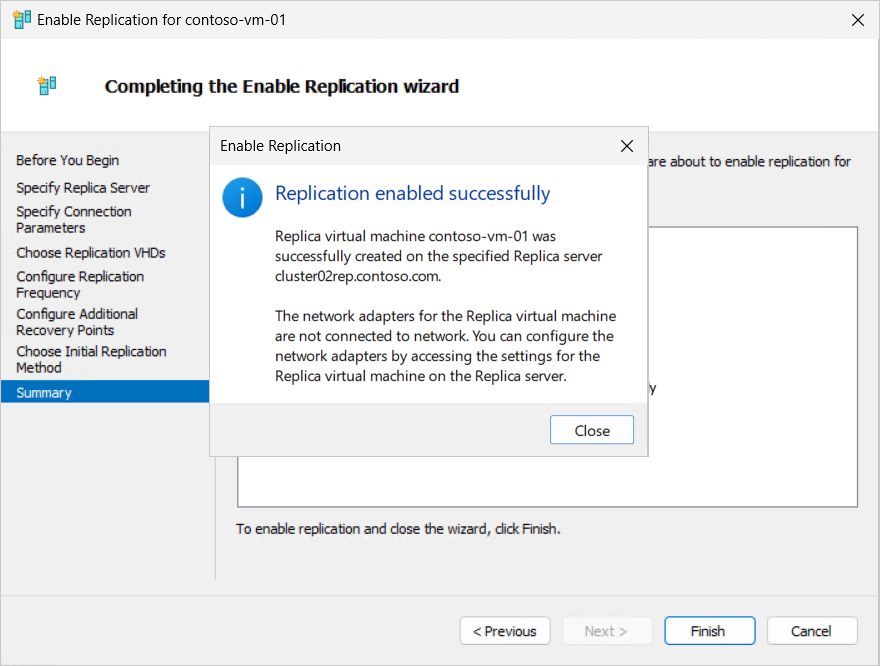
Review the summary information, and then select Finish.
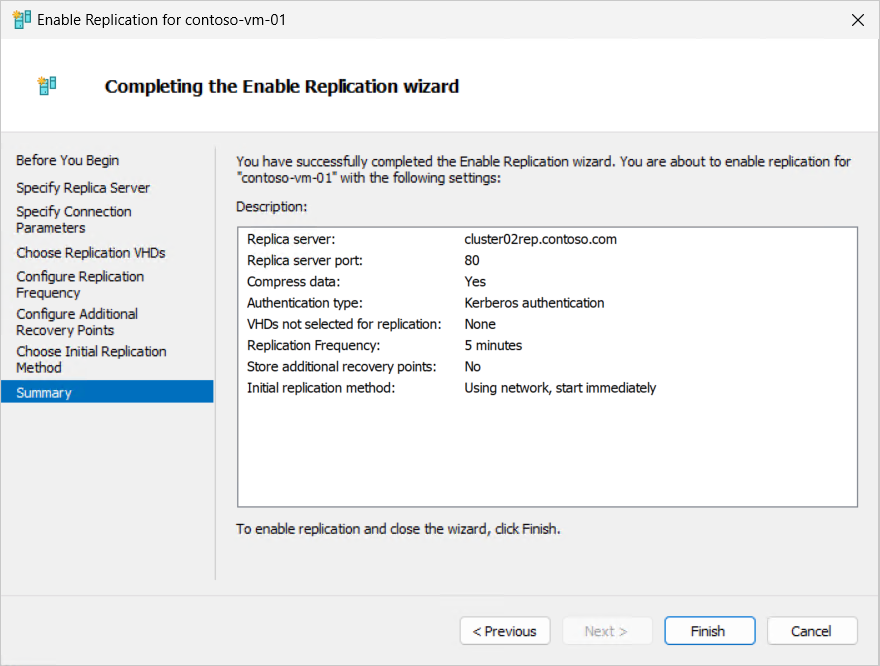
A dialog box appears to indicate that replication was successfully enabled.
To monitor the initial replication progress, see the section Monitor replication progress. You can change replication settings later if you need to in the Replication section of the VM settings.
If you chose to send the initial copy by using external media, see the section Send initial copy using external media for the process to import the initial copy. A placeholder VM is created on the replica site and its replication health state is Warning. The replica contents for the VM are stored on your external media in a subfolder for the VM. Once the export is complete, safely eject the external media and transport it to the replica server.
To replicate a virtual machine by using Failover Cluster Manager:
Open Failover Cluster Manager on a device you use to manage the primary cluster or a primary single host with the VM, or on one of the hosts in the cluster where Windows Server with Desktop Experience is installed.
In the resources pane, expand the name of the cluster you want to replicate to, and then select Roles.
Right-click the VM you want to replicate, select Replication, and then select Enable Replication. In the Enable Replication screen, if you see Before You Begin, select Next.
For Specify Replica Server, in the Replica Server box, enter either the NetBIOS or FQDN of the Replica server. If the Replica server is part of a failover cluster, enter the name of the Hyper-V Replica Broker. Then select Next. The connection to the replica server is verified to retrieve the authentication and port settings you configured for the replica server.
Review the replica server settings. If you're using certificate-based authentication, select Select Certificate, and then you're prompted to select the certificate for the primary host that matches the requirements. If you want to compress the data that is transmitted over the network, check the box. Select Next.
For Choose Replication VHDs, make sure the checkboxes for the VHDs you want to replicate are selected, and clear the checkboxes for any VHDs that you want to exclude from replication. Then select Next.
For Configure Replication Frequency, specify how often changes should be synchronized from the primary to replica clusters or hosts from 30 seconds, 5 minutes, or 15 minutes. Then select Next.
For Configure Additional Recovery Points, select Maintain only the latest recovery point or Create additional hourly recovery points and the number of extra recovery points you want to create in hours. Then select Next.
When you create extra hourly recovery points, you can also check the box Volume Shadow Copy Service (VSS) snapshot frequency if you want recovery points to provide application-consistent recovery points for VMs running VSS-aware applications.
For Choose Initial Replication, select the initial replication method. The total size of the initial copy is displayed. Select an option from the following list, and then select Next.
- Send initial copy over the network: this method is the default option.
- Send initial copy using external media: select Browse and specify a folder location on local or external media where the initial copy can be stored. To learn about the process to import the initial copy, see Send initial copy using external media.
- Use an existing virtual machine on the Replica server as the initial copy: restore the VM on the replica server and use it as the basis for replication, then replicate only the changes.
If you select Send initial copy over the network or Use an existing virtual machine on the Replica server as the initial copy, you can optionally specify whether to start replication immediately, or start replication at a specified time and date up to seven days in the future.
Review the summary information, and then select Finish. A dialog box appears to indicate that replication was successfully enabled.
To monitor the initial replication progress, see the section Monitor replication progress. You can change replication settings later if you need to in the Replication section of the VM settings.
If you chose to send the initial copy by using external media, see the section Send initial copy using external media for the process to import the initial copy. A placeholder VM is created on the replica site and its replication health state is Warning. The replica contents for the VM are stored on your external media in a subfolder for the VM. Once the export is complete, safely eject the external media and transport it to the replica server.
To replicate a virtual machine by using PowerShell, use the Enable-VMReplication cmdlet, which is part of the Hyper-V module, as shown in the following examples. Be sure to replace placeholder <values> with your own. This process works for replicating to either a cluster or a single host.
Open a PowerShell session as an administrator on one of the hosts in the primary cluster or a primary single host with the VM, or connect remotely by using the Enter-PSSession cmdlet on a device you use to manage the cluster or host.
Import the Hyper-V module by running the following command:
Import-Module Hyper-V
Enable VM replication for a VM by running the following command. This example uses Kerberos authentication over port 80 with default settings of a replication frequency of 5 minutes, and no extra recovery points. For more information about the available parameters, such as for certificate authentication or to exclude specific virtual hard disks, see Enable-VMReplication.
$parameters = @{
    VMName = '<VM name>'
    ReplicaServerName = '<Replica cluster broker or server FQDN>'
    ReplicaServerPort = '80'
    AuthenticationType = 'Kerberos'
}

Enable-VMReplication @parameters
Start VM replication immediately. Here are some examples:
To start replication and send the initial copy over the network immediately, run the following command. You can also specify a scheduled start time of up to seven days using the InitialReplicationStartTime parameter.
Start-VMInitialReplication -VMName $parameters.VMName
To send the initial replica by using external media, run the following command, then follow the process in the section Send initial copy using external media to learn how to import it to the replica server.
Start-VMInitialReplication -VMName $parameters.VMName -DestinationPath '<Path to store initial copy on external media>'
Replication begins. The time it takes to complete depends on the size of the VM. You can check the replication status by running the following command from the primary or replica host. You can change replication settings later if you need to with the Set-VMReplication cmdlet.
Get-VMReplication -VMName $parameters.VMName
The State property shows the current state of replication. If you chose to send the initial copy over the network, after the initial replication is complete, the state is Replicating, as shown in the following example output:
VMName        State       Health Mode    FrequencySec PrimaryServer ReplicaServer ReplicaPort AuthType Relationship
------        -----       ------ ----    ------------ ------------- ------------- ----------- -------- ------------
contoso-vm-01 Replicating Normal Primary 300          hyperv01      cluster02rep  80          Kerberos Simple
If you chose to send the initial copy by using external media, see the section Send initial copy using external media for the process to import the initial copy. A placeholder VM is created on the replica site and its replication health state is Warning. The replica contents for the VM are stored on your external media in a subfolder for the VM. Once the export is complete, safely eject the external media and transport it to the replica server.
Important
The following behaviors apply to VMs that you replicate:
When you replicate a VM, its network adapters aren't connected to a virtual switch on the replica host. After the initial replication is complete, connect any network adapters to a virtual switch on the replica host so that VMs are ready to bring online if you need to fail over.
If you make changes to the VM configuration, such as changing memory or processor settings or modifying network adapters, those changes aren't automatically replicated to the replica VM. You must manually update the replica VM if needed. Alternatively, you can remove replication and re-enable it to create a new replica VM with the updated configuration.
Hyper-V Replica points to a single default volume for VM replication. To prevent capacity or performance issues, move the VM's storage to a different volume than the default volume for replication.
If a VM runs an application that saves data across virtual hard disks, you can ensure that all virtual hard disks selected for replication are replicated to the same point in time. An example of where this approach is useful is when an application has one virtual hard disk dedicated for application data, and another virtual hard disk dedicated for application log files. To use this feature, configure VM replication by using PowerShell with the Enable-VMReplication cmdlet and add the parameter EnableWriteOrderPreservationAcrossDisks. For more information, see Enable-VMReplication.
If you send the initial copy by using external media, such as a hard disk or USB drive, the process creates a placeholder VM on the replica site with a checkpoint. The process stores the replica contents for the VM on your external media in a subfolder for the VM. You transport the initial copy to the replica server, then import it to the placeholder VM.
You can enable replication by using Hyper-V Manager, Failover Cluster Manager, PowerShell, or Windows Admin Center - Virtualization mode. Select the relevant tab for instructions.
To send the initial copy by using external media and import it by using Windows Admin Center - Virtualization mode:
Follow the steps in the section Replicate a virtual machine by using Windows Admin Center - Virtualization mode. The process creates a placeholder VM on the replica site and sets its replication state to Initial replication in progress. The process stores the replica contents for the VM on your external media in a subfolder for the VM. Safely eject the external media and transport it to the replica server.
In Windows Admin Center - Virtualization mode, from the left pane, select the host to which you're replicating the VM.
From the list of tools for the host, select Virtual machines, and then select the placeholder VM to enter its overview.
In the Replication section, select Import Initial Replica.

In the pane that opens, enter the file path to the location where the initial copy is stored. You can also select Browse to go to the location. Select Complete Initial Replication.

The process applies the initial checkpoint to the placeholder VM and changes the replication health state to Ok. Replication continues at the specified frequency. To monitor continued replication progress, see the section Monitor replication progress.
To send the initial copy by using external media and import it by using Hyper-V Manager:
Follow the steps in the section Replicate a virtual machine using Hyper-V Manager. The process creates a placeholder VM on the replica site and sets its replication health state to Warning. The process stores the replica contents for the VM on your external media in a subfolder for the VM. Once the export is complete, safely eject the external media and transport it to the replica server.
Open Hyper-V Manager on a device you use to manage the replica host, or on the replica host itself where Windows Server with Desktop Experience is installed.
In the resources pane, select the host that contains the placeholder VM you're replicating.
Right-click the placeholder VM, then select Import Initial Replica.
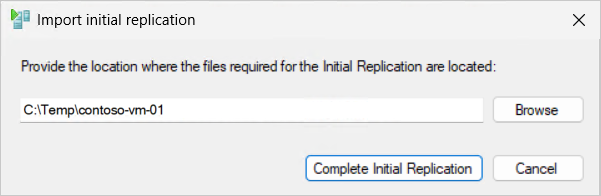
Specify the location where the initial copy is stored, then select Complete Initial Replication.
The process applies the initial checkpoint to the placeholder VM and changes the replication health state to Normal. Replication continues at the specified frequency. See the section Monitor replication progress to monitor continued replication progress.
To send the initial copy by using external media and import it by using Failover Cluster Manager:
Follow the steps in the section Replicate a virtual machine using Failover Cluster Manager. A placeholder VM is created on the replica site and its replication health state is Warning. The replica contents for the VM are stored on your external media in a subfolder for the VM. Once the export is complete, safely eject the external media and transport it to the replica server.
Open Failover Cluster Manager on a device you use to manage the cluster with the VM, or one of the hosts in the cluster where Windows Server with Desktop Experience is installed.
In the resources pane, expand the name of the cluster you want to replicate to, and then select Roles.
Right-click the placeholder VM, then select Import Initial Replica.
Specify the location where the initial copy is stored, then select Complete Initial Replication.
The initial checkpoint is applied to the placeholder VM, so the replica contents are now synchronized with the primary VM as of that checkpoint, and the replication health state changes to Normal. Replication continues at the specified frequency. See the section Monitor replication progress to monitor continued replication progress.
To send the initial copy by using external media and import it by using PowerShell:
Follow the steps in the section Replicate a virtual machine by using PowerShell. The process creates a placeholder VM on the replica site, and its replication health state is Warning. The process stores the replica contents for the VM on your external media in a subfolder for the VM. When the export finishes, safely eject the external media and transport it to the replica server.
Open a PowerShell session as an administrator on one of the replica hosts, or connect remotely by using the Enter-PSSession cmdlet on a device you use to manage the cluster or host.
Import the initial replica by running the following command:
$parameters = @{
   VMName = '<VM name>'
   Path = '<Path to initial copy on external media>'
}

Import-VMInitialReplica @parameters
The time it takes to complete depends on the size of the VM and the speed of your external media. When the command finishes, it applies the initial checkpoint to the placeholder VM and changes the replication health state to Normal. Replication continues at the specified frequency. You can check the replication status by running the following command from the primary or replica host:
Get-VMReplication -VMName $parameters.VMName
The State property shows the current state of replication. After the initial replication finishes, the state is Replicating, as shown in the following example output:
VMName        State       Health Mode    FrequencySec PrimaryServer ReplicaServer ReplicaPort AuthType Relationship
------        -----       ------ ----    ------------ ------------- ------------- ----------- -------- ------------
contoso-vm-01 Replicating Normal Primary 300          hyperv01      cluster02rep  80          Kerberos Simple
See the section Monitor replication progress to monitor continued replication progress.
Monitor replication progress
You can monitor the progress of the initial replication and ongoing replication by using Hyper-V Manager, Failover Cluster Manager, PowerShell, or Windows Admin Center - Virtualization mode. The replication health states are:
Normal: Replication cycles complete on schedule (RPO met), backlog is minimal, and there are no recent replication errors. No action needed.
Warning: Replication works but lags or backlog grows (often transient network or storage load). Monitor and investigate if it doesn't clear quickly.
Critical: Replication stalls or fails. The RPO is at risk as changes aren't applying. Investigate immediately, such as check connectivity, storage capacity and performance, authentication and certificates, and event logs. Resume or resynchronize as required.
Select the relevant tab for instructions.
To monitor replication progress by using Windows Admin Center - Virtualization mode:
In Windows Admin Center - Virtualization mode, from the left pane, expand the host that contains the VM you're replicating, and then select the VM to enter its overview.
In the Replication section, view summary replication information, such as the replication health, last synchronized time, and primary and replica host FQDNs.

To monitor replication progress by using Hyper-V Manager:
Back in Hyper-V Manager, select a host.
In the central pane, add a column for Replication Health to show the high-level health status of replication for each VM. Right-click on any column heading, select Add/Remove Columns. In the list of Available Columns, select Replication Health, and then select Add to move it to Displayed Columns. Select OK.
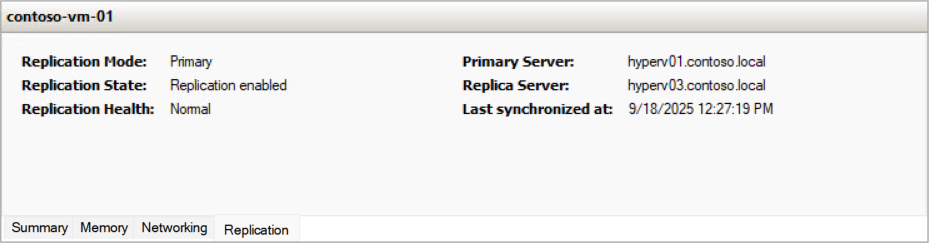
View summary replication information, such as the last synchronized time and primary and replica host FQDNs. Select the VM, and then in the bottom pane select the Replication tab.
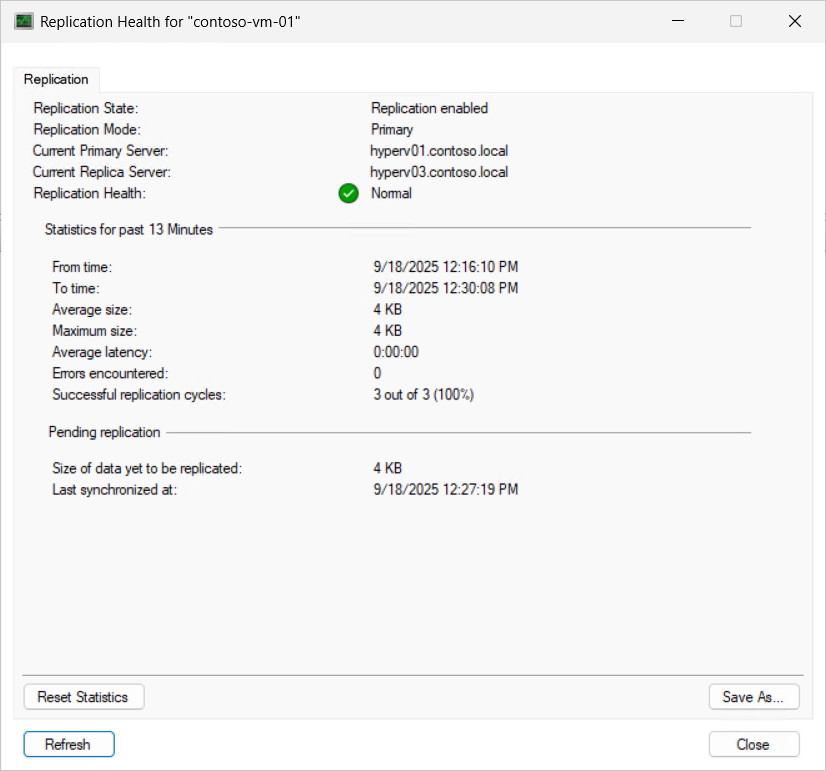
To view more detailed replication information, right-click the VM and select Replication, and then View Replication Health. You can reset the replication statistics if needed by selecting Reset Statistics.
To monitor replication progress by using Failover Cluster Manager:
In Failover Cluster Manager, select the name of your cluster, and then select Roles.
View summary replication information, such as the last synchronized time and primary and replica host FQDNs. Select the VM, and then in the bottom pane select the Replication tab.

To view more detailed replication information, right-click the VM and select Replication, and then View Replication Health. You can reset the replication statistics if needed by selecting Reset Statistics.
To monitor replication progress by using PowerShell, use the Get-VMReplication cmdlet, as shown in the following examples. Replace placeholder <values> with your own values.
Return to the existing PowerShell session where you enabled replication.
Run the following command to view replication configuration information, such as the health, and primary and replica host FQDNs:
Get-VMReplication -Name '<VM name>'
Here's an example of the output:
VMName        State       Health Mode    FrequencySec PrimaryServer ReplicaServer ReplicaPort AuthType Relationship
------        -----       ------ ----    ------------ ------------- ------------- ----------- -------- ------------
contoso-vm-01 Replicating Normal Replica 300          hyperv01      cluster02rep  80          Kerberos Simple
Run the following command to view replication performance information, such as the last synchronized time and average replication size:
Measure-VMReplication -VMName '<VM name>'
Here's an example of the output:
VMName        State       Health LReplTime             PReplSize(M) AvgLatency AvgReplSize(M) Relationship
------        -----       ------ ---------             ------------ ---------- -------------- ------------
contoso-vm-01 Replicating Normal 9/23/2025 10:22:30 AM 0.00         01:39:43   0.0039         Simple
Run the following command to reset the replication statistics:
Reset-VMReplicationStatistics -VMName '<VM name>'
You can configure static IP injection to control the IP address a VM uses when it starts after a failover. If you want the VM to use a dynamically assigned IP address, you don't need to configure these settings. Regardless of the failover type, ensure that you set these values on both the primary server and replica server. The affected VM and the server it runs on must use the same version of integration services.
Static IP injection supports both IPv4 and IPv6 addresses. You configure static IP injection on the replica VM after replication is enabled. The settings are stored in the VM configuration and applied during failover by the Key Value Pair (KVP) Exchange integration component running in the guest operating system.
Note
Static IP injection requires:
- The latest version of integration services installed in the guest VM.
- Synthetic network adapters (not legacy network adapters).
- A supported Windows guest operating system.
Select the relevant tab for instructions.
To configure static IP injection by using Windows Admin Center - Virtualization mode:
Go to your URL for Windows Admin Center - Virtualization mode and sign in.
In the resources pane, expand the host that contains the replica VM, and then select the VM to enter its overview.
From the list of tools for the VM, select Settings.
In the Settings pane, under the VM settings, select Replication.
Select the Networking tab.
To configure IPv4 settings, on the IPv4 TCP/IP Settings sub-tab:
Select the check box for Use the following IPv4 address scheme for the virtual machine.
Enter the IPv4 Address, Subnet Mask, Default Gateway, Preferred DNS Server, and optionally an Alternate DNS Server.
To configure IPv6 settings, select the IPv6 TCP/IP Settings sub-tab and enter the corresponding IPv6 address information.
Select Save replication settings to apply the changes.
To configure static IP injection by using Hyper-V Manager:
Open Hyper-V Manager on a device you use to manage the host with the replica VM, or on the host itself where Windows Server with Desktop Experience is installed.
In the resources pane, select the host that contains the replica VM.
Right-click the replica VM, and then select Settings.
In the Settings dialog, select Network Adapter, and then select Failover TCP/IP.
To configure IPv4 settings:
Select Use the following IPv4 address.
Enter the IPv4 Address, Subnet mask, Default gateway, Preferred DNS server, and optionally an Alternate DNS server.
To configure IPv6 settings, select Use the following IPv6 address and enter the corresponding IPv6 address information.
Select OK to save the settings.
To configure static IP injection by using Failover Cluster Manager:
Open Failover Cluster Manager on a device you use to manage the cluster with the replica VM.
In the resources pane, expand the name of the cluster, and then select Roles.
Right-click the replica VM, and then select Settings.
In the Settings dialog, select Network Adapter, and then select Failover TCP/IP.
To configure IPv4 settings:
Select Use the following IPv4 address.
Enter the IPv4 Address, Subnet mask, Default gateway, Preferred DNS server, and optionally an Alternate DNS server.
To configure IPv6 settings, select Use the following IPv6 address and enter the corresponding IPv6 address information.
Select OK to save the settings.
To configure static IP injection by using PowerShell, use the Set-VMNetworkAdapterFailoverConfiguration cmdlet. Run the following commands on the host that contains the replica VM. Replace placeholder <values> with your own values.
To set an IPv4 failover address, run the following command:
Set-VMNetworkAdapterFailoverConfiguration -VMName '<VM name>' -IPv4Address '<IPv4 address>' -IPv4SubnetMask '<Subnet mask>' -IPv4DefaultGateway '<Default gateway>' -IPv4PreferredDNSServer '<Preferred DNS>' -IPv4AlternateDNSServer '<Alternate DNS>'
To set an IPv6 failover address, run the following command:
Set-VMNetworkAdapterFailoverConfiguration -VMName '<VM name>' -IPv6Address '<IPv6 address>' -IPv6SubnetPrefixLength <Prefix length> -IPv6DefaultGateway '<Default gateway>' -IPv6PreferredDNSServer '<Preferred DNS>' -IPv6AlternateDNSServer '<Alternate DNS>'
To configure a specific virtual switch for test failover, use the Set-VMNetworkAdapter cmdlet:
Set-VMNetworkAdapter -VMName '<VM name>' -TestReplicaSwitchName '<Virtual switch name>'
You can configure extended replication, which enables you to replicate a VM to a third location, from one replica server to another replica server. This approach can help you meet compliance requirements for offsite backups or provide an extra layer of protection for your workloads.
You can enable extended replication by using Windows Admin Center - Virtualization mode, Hyper-V Manager, Failover Cluster Manager, or PowerShell.
Select the relevant tab for instructions.
To configure extended replication by using Windows Admin Center - Virtualization mode:
Go to your URL for Windows Admin Center - Virtualization mode and sign in.
In the resources pane, expand the host that contains the virtual machine you want to configure extended replication for, and then select the virtual machine to enter its overview.
Scroll to the Replication section, select Extend Replication to open the Extended Replication configuration.
For the Replication Connection tab, enter the following information, and then select Replication Configuration to continue:
For Replica server, enter either the NetBIOS or FQDN of the Hyper-V host or cluster you're extending replication to.
For Replica server port, enter the port number you configured on the extended replica host for Hyper-V Replica.
For Authentication type, select the correct value from Use Kerberos authentication (HTTP) or Use Certificate-based authentication (HTTPS) based on the authentication method you configured on the extended replica host. If you're using certificate-based authentication, select Select to choose the certificate. If you want to compress the data that is transmitted over the network, check the box.
For the Replication Configuration tab, complete the following information, then select Initial Replication to continue:
For Configure replication frequency, select 5 minutes or 15 minutes. Extended replication doesn't support a 30-second frequency.
For Configure additional recovery points, select Maintain only the latest recovery point or Create additional hourly recovery points.
For the Initial Replication tab, select the initial replication method, and then select Review to continue.
Review the summary information, and then select Enable Replication.
To configure extended replication by using Hyper-V Manager:
Open Hyper-V Manager on a device you use to manage the host with the VM, or on the host itself where Windows Server with Desktop Experience is installed.
In the resources pane, select the host that contains the VM you want to configure extended replication for.
Right-click the VM you want to configure extended replication for, and then select Replication > Extend Replication.
The process to configure extended replication is similar to replicating a VM to the first replica location. Follow the process in the section Replicate a virtual machine with the following exceptions:
- You can't specify which virtual hard disks to replicate. The virtual hard disks that are replicated to the first replica server are used for extended replication.
- The replication frequency can only be 5 minutes or 15 minutes.
- You can't change the authentication type.
To configure extended replication by using Failover Cluster Manager:
Open Failover Cluster Manager on a device you use to manage the cluster with the VM, or one of the hosts in the cluster where Windows Server with Desktop Experience is installed.
In the resources pane, expand the name of the cluster you want to replicate to, and then select Roles.
Right-click the VM you want to replicate, and then select Replication > Extend Replication.
The process to configure extended replication is similar to replicating a VM to the first replica location. Follow the process in the section Replicate a virtual machine with the following exceptions:
- You can't specify which virtual hard disks to replicate. The virtual hard disks that are replicated to the first replica server are used for extended replication.
- The replication frequency can only be 5 minutes or 15 minutes.
The process to configure extended replication is the same as replicating a VM to the first replica location. Follow the process in the section Replicate a virtual machine with the following exceptions:
- You can't specify which virtual hard disks to replicate. The virtual hard disks that are replicated to the first replica server are used for extended replication.
- The replication frequency can only be 5 minutes or 15 minutes.
Next step
After you enable replication for a VM, you can test failover to the replica server without impacting ongoing replication. For more information about performing a test failover and how to fail over during an outage, see Failover a replicated virtual machine with Hyper-V Replica.


